✔️Checking your progress
We wanted to make the learning experience as straightforward and frictionless as possible for you, so we've included a way for you to check that your version of the project is correct at each and every stage of the tutorial as you work through it.
We've already drawn your attention to the finished project on CodeSandBox, but the final version of the code is not necessarily the best resource to refer to if at any particular stage your code isn't working as expected, or if you're getting errors in the terminal or in the browser console.
So, for each step in this tutorial we have created a commit in this repo with just the changes made in that step.
If you get stuck at any point then you can compare your code at the relevant stage to the tagged commits in the repo.
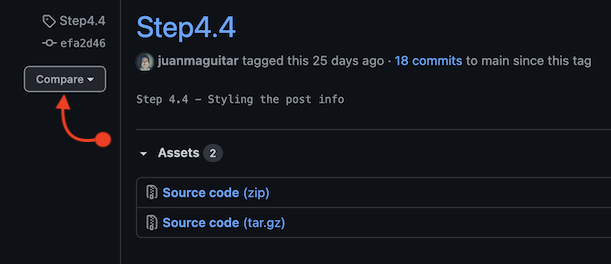
To view the differences (diffs) at that stage you can click the link as highlighted in the screengrab below:

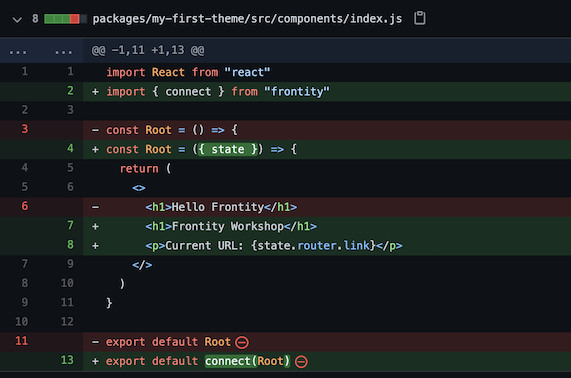
In case you're not familiar with viewing diffs in a repo, you'll see something like this:

Lines with a 🔴 red background marked with a minus sign ➖ are removed at that step.
Lines with a 🟢 green background marked with a plus sign ➕ are added at that step.
Sometimes lines are newly added or totally removed, but quite often an added line is a modified version of the removed line. For example, in the screengrab above, line 2 and line 8 are new but all other added lines are a modified replacement for the removed line above it.
You can also download the code completed up to a particular step by using the zip or tar.gz links for that tagged commit.

If you are on a tag page you can compare the changes between that step and any other arbitrarily selected step by using the 'Compare' button.

At the end of each lesson (and sometimes within a lesson) you will see a box like this one with a link going directly to the commit that has the changes in that lesson (or that part of the lesson):

Last updated